用 MotionLayout 来做过渡动画
MotionLayout 是一个 Google 官方出品用于制作 Android 中的过渡动画的框架。用来它就能轻松的做出一些较为复杂的动画效果。
由于 MotionLayout 是基于 ConstraintLayout ,所以其中涉及到了部分关于 ConstraintLayout 的基本知识,本文按下不表,对 ConstraintLayout 不熟悉的同学,可以查看鸿洋的这篇博客。
MotionLayout 是 ConstraintLayout 的子类,并且在 ConstraintLayout 发展到 2.0 时才加入 ConstraintLayout 这个库,本文所使用的依赖为:
1
| implementation 'androidx.constraintlayout:constraintlayout:2.0.0-beta2'
|
接下来让我们进入正题,先来看看我用 MotionLayout 制作的一个 Demo。
在这个例子中,当点击 Login 按钮时,Login 按钮的长度进行不断缩小,缩小到一定尺寸时,外层的 ProgressBar 还是逐渐由不可见变为可见,同时,Login 按钮上的字进行了淡入淡出的动画效果。
MotionLayout 能做的不仅如此,它还能做到其他更为好玩有趣的过渡动画。现在让我们来学一下吧。
过渡动画,顾名思义就是在状态之间进行过渡的动画效果,防止页面内 View 出现瞬间移动的效果。而 MotionLayout 的重点其实就是状态。开发者只需要定义好对应状态下 View 的相对位置,以及相关属性,其后 MotionLayout 便会自动为其增加动的效果。
这样的一个最简单的效果是怎么做出来的呢?
首先我们需要在资源文件夹 res 下新建一个名为 xml 的资源文件夹,然后再 xml 文件夹内新建一个根节点是 MotionScene 的 xml 文件,demo 中这个 xml 的文件名为 login_animator。
以下就是实现 Login 按钮长度变换的过渡动画。
1
2
3
4
5
6
7
8
9
10
11
12
13
14
15
16
17
18
19
20
21
22
23
24
25
26
27
28
29
30
31
32
33
34
35
36
37
38
39
40
41
| <?xml version="1.0" encoding="utf-8"?>
<MotionScene xmlns:android="http://schemas.android.com/apk/res/android"
xmlns:app="http://schemas.android.com/apk/res-auto">
<Transition
app:constraintSetEnd="@id/a_login_end"
app:constraintSetStart="@id/a_login_start"
app:duration="1000">
<OnClick
app:clickAction="toggle"
app:targetId="@id/tv_action_login" />
</Transition>
<ConstraintSet android:id="@+id/a_login_start">
<Constraint android:id="@+id/tv_action_login">
<Layout
android:layout_width="match_parent"
android:layout_height="48dp"
android:layout_marginTop="30dp"
android:layout_marginStart="30dp"
android:layout_marginEnd="30dp"
app:layout_constraintTop_toBottomOf="@id/et_passwd" />
</Constraint>
</ConstraintSet>
<ConstraintSet android:id="@+id/a_login_end">
<Constraint android:id="@+id/tv_action_login">
<Layout
android:layout_width="48dp"
android:layout_height="48dp"
android:layout_marginTop="30dp"
app:layout_constraintEnd_toEndOf="@+id/et_account"
app:layout_constraintStart_toStartOf="@+id/et_account"
app:layout_constraintTop_toBottomOf="@id/et_passwd" />
</Constraint>
</ConstraintSet>
</MotionScene>
|
仔细看其中的信息,其中大部分是我们都熟悉的,无非就是对 View 的相对位置的约定或是 View 自身属性的规定,少部分是关于过渡动画的。
我们先来看看这个文件的整体结构,首先根节点是 MotionScene ,MotionScene 节点下有一个 Transition 与两个 ConstraintSet 节点,而且 Transition 中有两个属性,一个是 constraintSetStart 另一个是 constraintSetEnd,这两个属性的值正好是两个 ConstraintSet 节点的 id,而 Transition 内子节点 OnClick 节点内的属性 targetId 则表明了当前 Transition 所指定的动画是作用于具体的 View 上。
如你所想,通过在 Transition 内指定某个 View 的两个状态下的不同属性,就能产生在这两个状态内的过渡动画,并且在 Translation 内通过组合不同的动画事件进行显示。比如点击产生的动画(OnClick),滑动产生的动画(OnSwipe),以及可改变某一帧动画效果的关键帧动画(KeyFrameSet)。
当我们把初始及结束状态下的属性及动画定义完成后,还需要回到我们的布局文件,将需要实现过渡动画的 View 的父布局改为 MotionLayout 并且给它添加一个值为刚才我们新建那个 xml 文件的引用的属性 layoutDescription。
1
2
3
4
5
6
7
8
9
| <?xml version="1.0" encoding="utf-8"?>
<androidx.constraintlayout.motion.widget.MotionLayout xmlns:android="http://schemas.android.com/apk/res/android"
xmlns:app="http://schemas.android.com/apk/res-auto"
xmlns:tools="http://schemas.android.com/tools"
android:layout_width="match_parent"
android:layout_height="match_parent"
app:layoutDescription="@xml/login_animator">
......
</androidx.constraintlayout.motion.widget.MotionLayout>
|
这就是一个最为简单的使用 MotionLayout 实现过渡动画的例子,它与开头我自己写的那个 demo 没什么差别,无非就是 demo 中变换的 View 的个数及属性多少不同而已。
在这个例子中,我们通过在 Transition 中定义了一个 OnClick 的子节点,而达到点击产生动画的效果。其中,targetId 即为产生动画效果的目标 View 的 id;clickAction 则是指明在是在开始或是再结束状态时产生动画,toggle 表示在开始和结束状态时均有效,它还有 transitionToStart 和 transitionToEnd 表示只在开始或是结束状态下有效。有兴趣的可以去试试。
除了 OnClick,我们还可以在 Translation 中定义 OnSwipe 节点,OnSwipe 就是用来处理屏幕上的滑动事件,以此配合指定的 View 实现过渡动画的效果。
给 MotionLayout 添加 motionDebug=”SHOW_PATH” 这个属性,即可查看 View 的过渡动画的轨迹。
通过指定 View 的开始状态(靠近屏幕左边)和结束状态(靠近屏幕右边),然后在 Translation 中声明出滑动事件,即可。
1
2
3
4
5
6
7
8
9
10
11
12
13
14
15
16
17
18
19
20
21
22
23
24
25
26
27
28
29
30
31
32
33
34
35
36
37
38
39
| <?xml version="1.0" encoding="utf-8"?>
<MotionScene xmlns:android="http://schemas.android.com/apk/res/android"
xmlns:app="http://schemas.android.com/apk/res-auto">
<Transition
app:constraintSetEnd="@id/v_swipe_end"
app:constraintSetStart="@id/v_swipe_start"
app:duration="1000">
<OnSwipe
app:dragDirection="dragRight"
app:touchRegionId="@id/v_swipe" />
</Transition>
<ConstraintSet android:id="@+id/v_swipe_start">
<Constraint android:id="@+id/v_swipe">
<Layout
android:layout_width="48dp"
android:layout_height="48dp"
app:layout_constraintBottom_toBottomOf="parent"
app:layout_constraintStart_toStartOf="parent"
app:layout_constraintTop_toTopOf="parent" />
</Constraint>
</ConstraintSet>
<ConstraintSet android:id="@+id/v_swipe_end">
<Constraint android:id="@+id/v_swipe">
<Layout
android:layout_width="48dp"
android:layout_height="48dp"
app:layout_constraintBottom_toBottomOf="parent"
app:layout_constraintEnd_toEndOf="parent"
app:layout_constraintTop_toTopOf="parent" />
</Constraint>
</ConstraintSet>
</MotionScene>
|
在 OnSwipe 中,有两个属性,一个是 dragDirection 代表的是滑动的方向,touchRegionId 则指明了监听的滑动区域为 View 的滑动区域。既然能作用于 View 的滑动区域,是不是也能作用于整个屏幕的滑动区域呢?没错,touchAnchorId 则表示全部的滑动区域。OnSwipe 还有一些其他属性,比如:touchAnchorSide 表示监听 View 的哪个区域的滑动监听,如果不设置的话,是 View 外的所有区域;onTouchUp 表示当在滑动过程中手指抬起时动画的动作(回到开始状态、回到结束状态、自动完成、停止等等)。
说实话,我在开始尝试 MotionLayout 的时候被 OnSwipe 给吓到了,但是当我更进一步的使用 KeyFrameSet 的时候直喊 666。原因就是因为 KeyFrameSet 能做出更炫酷的效果。
KeyFrameSet 是作用于在过渡动画过程中的关键帧,通过指定动画关键进程时的状态来实现不同的效果。举个例子,当前的 View 滑动是一条直线,我想让在滑动过程中有一个先向上滑动,然后向下滑动以这种效果达到屏幕的最右侧。
View 的开始与结束状态没有发生改变,只是在过渡动画的中点区域进行改变 View 的坐标。
1
2
3
4
5
6
7
8
9
10
11
12
13
14
15
16
17
18
| <Transition
app:constraintSetEnd="@id/v_swipe_end"
app:constraintSetStart="@id/v_swipe_start"
app:duration="1000">
<OnSwipe
app:dragDirection="dragRight"
app:touchAnchorId="@id/v_swipe"
app:touchAnchorSide="bottom" />
<KeyFrameSet>
<KeyPosition
app:framePosition="50"
app:keyPositionType="parentRelative"
app:motionTarget="@+id/v_swipe"
app:percentY="0.3" />
</KeyFrameSet>
</Transition>
|
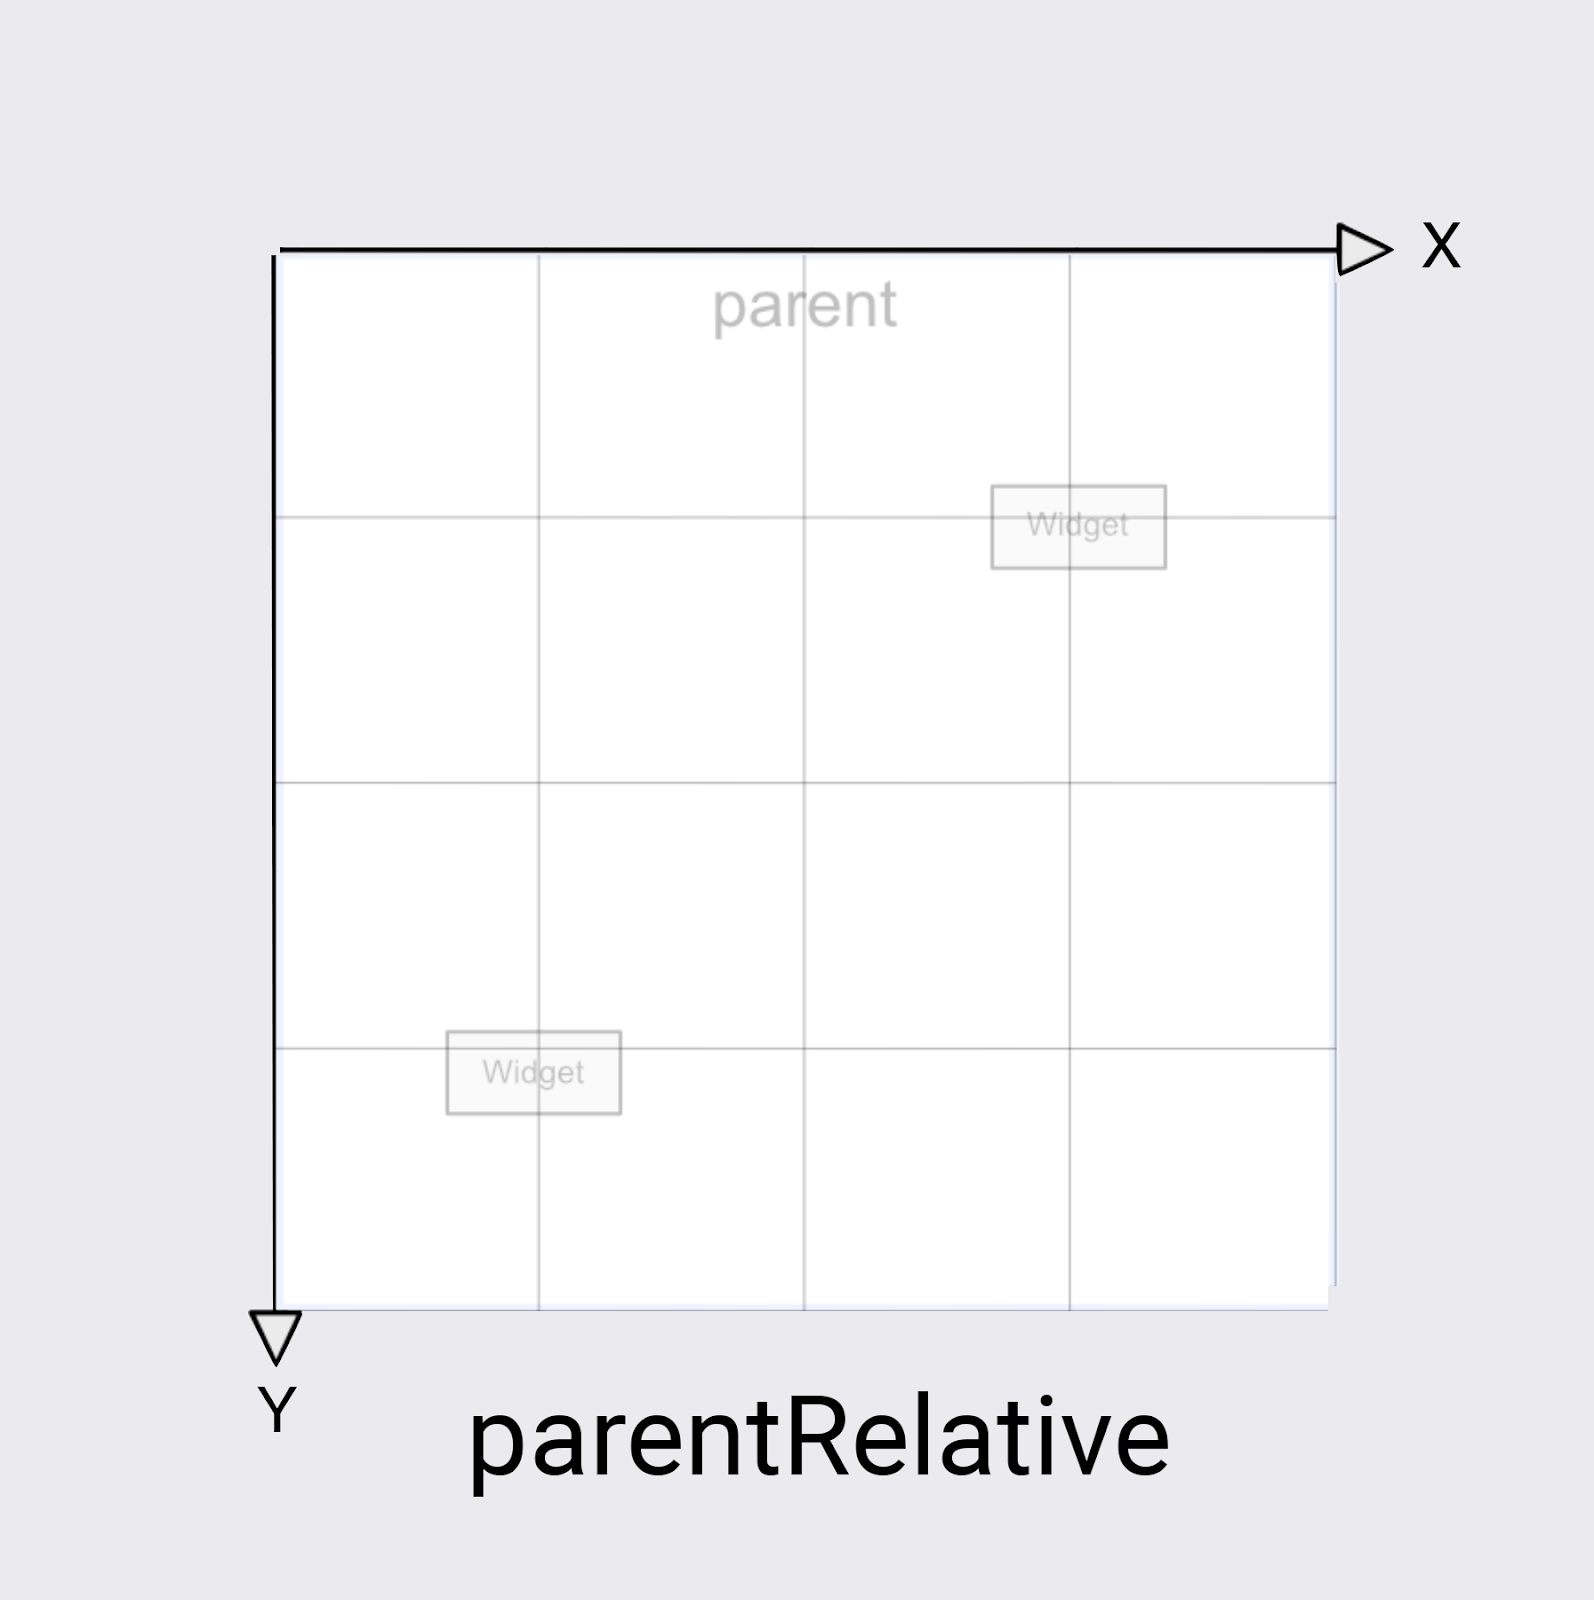
framePosition 表示在运动到整个运动过程的 50% 处,这个值的取值范围是 0 - 100,motionTarget 表示作用的 View,而 keyPositionType 与percentY 则共同决定了运动轨迹中弧度的变化方向。keyPositionType 控制 percentY 的坐标系的工作方式,它一共有 3 个值。parentRelative、deltaRelative、pathRelative。percentY 取值范围为 0 - 1,同时允许负数及大于 1 的值。
parentRelative 表示,坐标按照父布局的坐标进行处理,X,Y 轴的最大值均为1,X 轴向右为正,向左为负,Y 轴向下为正,向上为负。
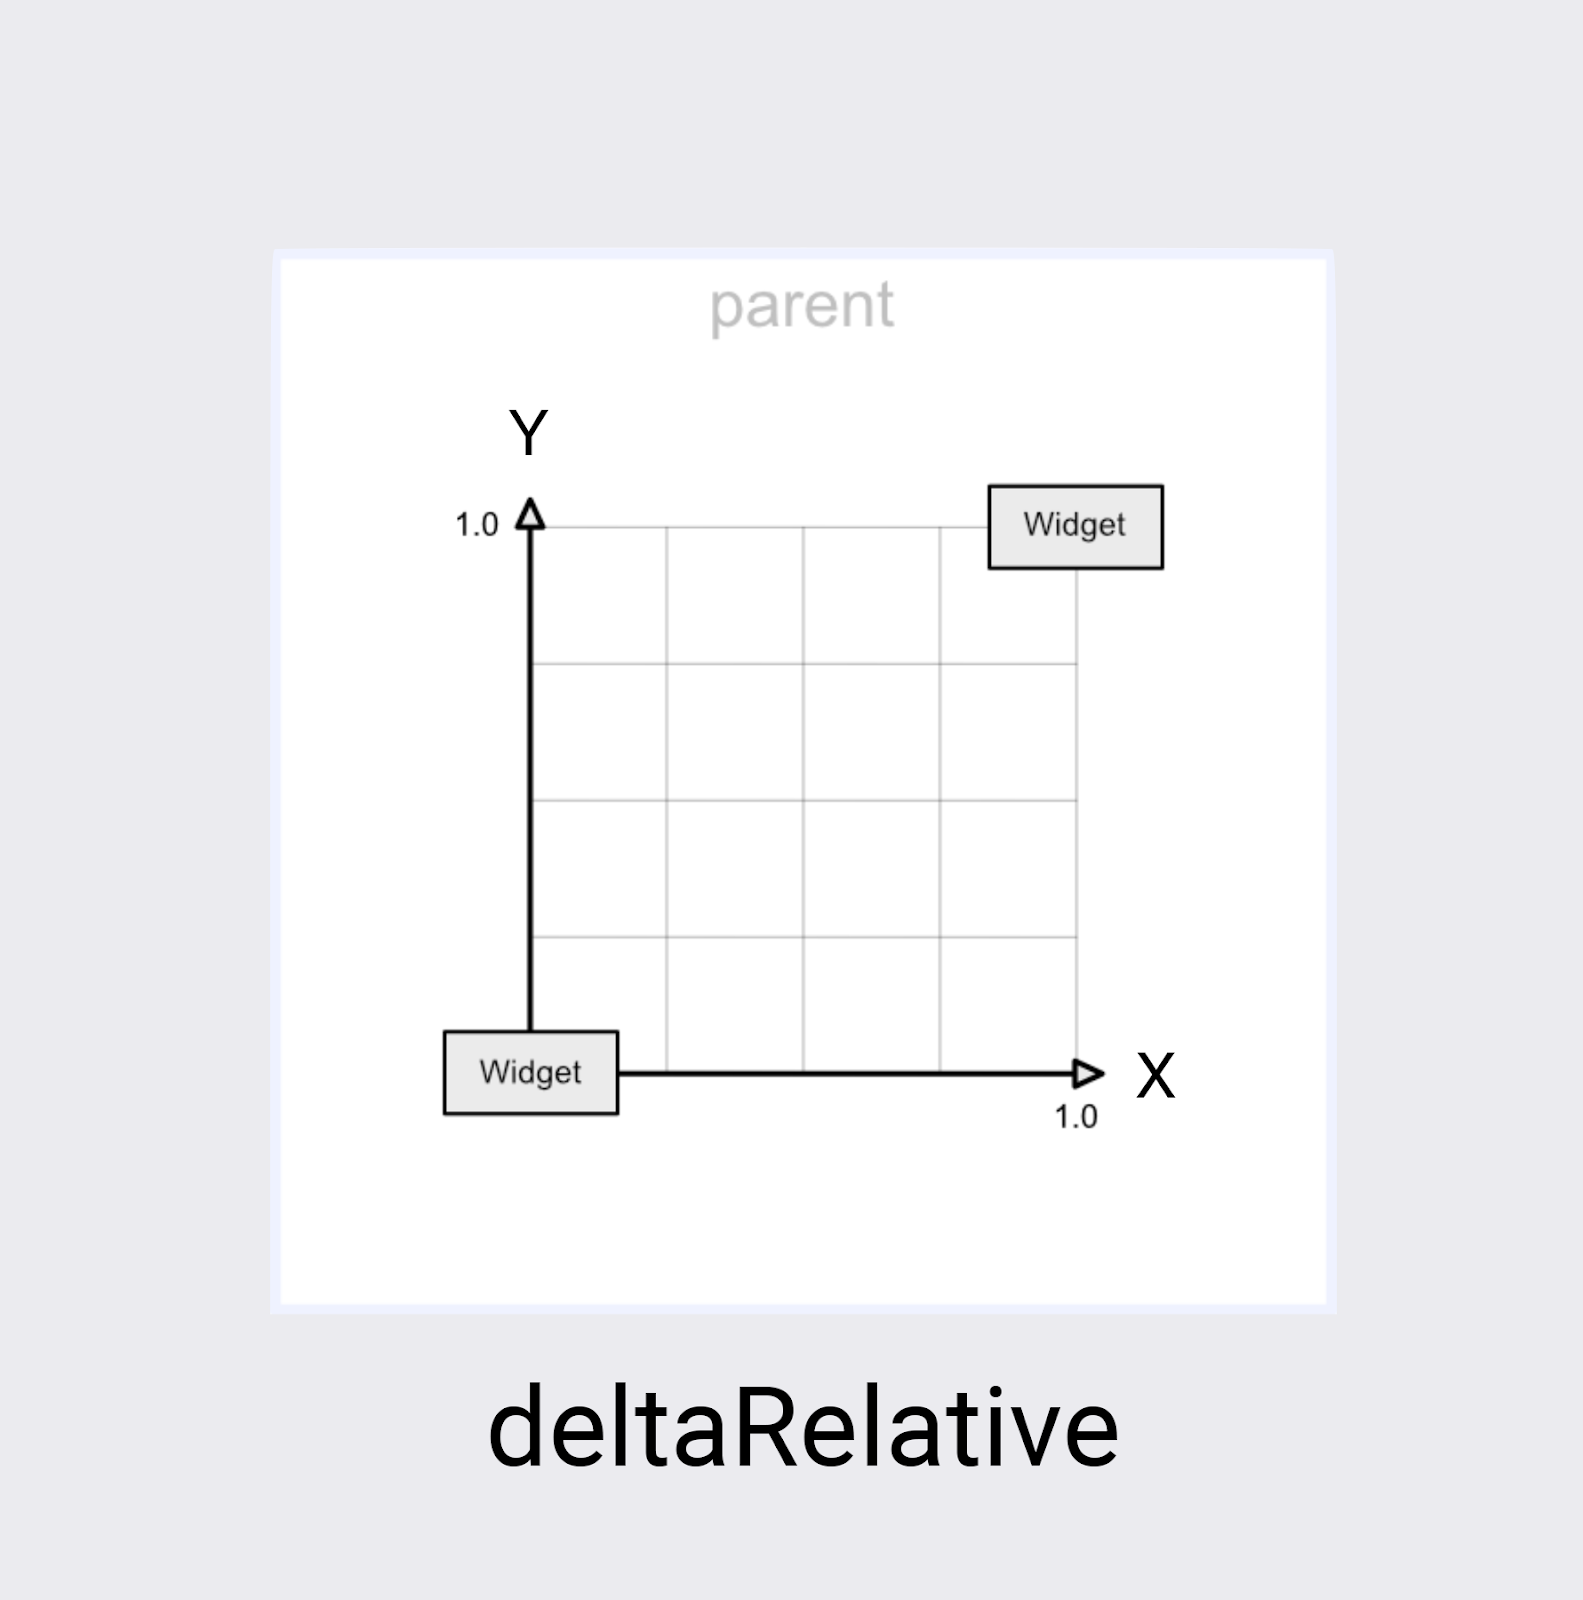
deltaRelative 表示开始状态的中心点为坐标系原点,X,Y 轴的最大值均为1,X 轴向右为正,向左为负,Y 轴向下为负,向上为正。
pathRelative 表示开始状态的中心点为坐标系原点,X 轴为两个状中心点的构成的直线。X,Y 轴的最大值均为1,X 轴向结束状态方向为正,向开始状态方向为负,Y 轴向下为负,向上为正。
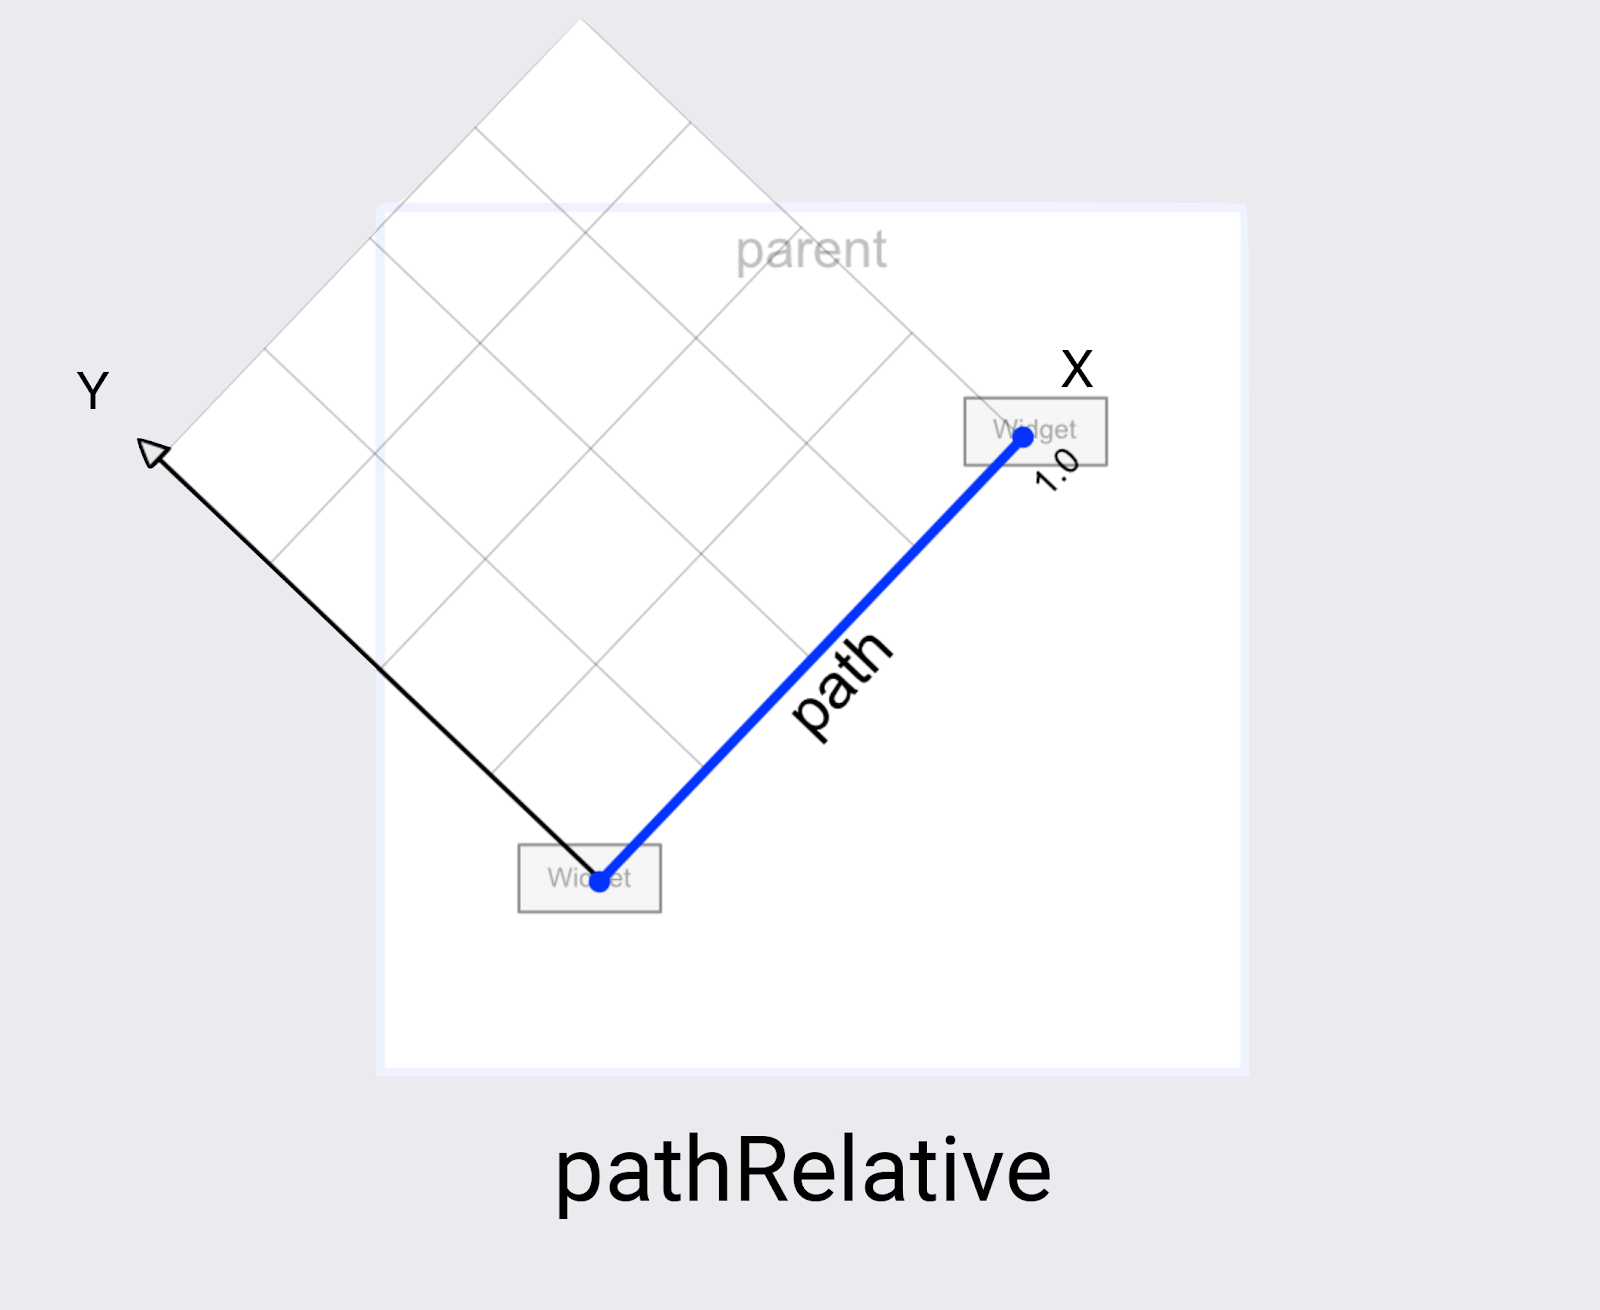
keyPositionType 三个属性的描述图均来自 CodeLab
KeyPostition 还有些其他有趣的属性,比如,控制运动轨迹是平滑的曲线还是直线的 curveFit,以及 transitionEasing 控制运动过程的加速或是减速等等。这里就不一一举例了。
而且,还可以同时存在多个关键帧进行控制动画效果。
1
2
3
4
5
6
7
8
9
10
11
| <KeyFrameSet>
<KeyPosition
app:framePosition="50"
app:keyPositionType="parentRelative"
app:motionTarget="@+id/v_swipe"
app:percentY="0.3" />
<KeyAttribute
android:alpha="0"
app:framePosition="50"
app:motionTarget="@+id/v_swipe" />
</KeyFrameSet>
|
keyAttribute 是用于在过渡动画中控制 View 的属性,比如在动画执行 50% 时,View 的 alpha 值为 0 ,那么在从 0 - 50% 及 50% - 100% 的过程中,则由 MotionLayout 根据其执行时间自动改变 View 的状态。
刚才聊的都是关于动画本身的内容,实际上,MotionLayout 提供更多方式来对 View 进行状态改变,不只是通过在 ConstraintSet 中指定 Layout 来改变 View 的相对位置,它还提供了更为丰富的方法进行改变 View 的状态,比如:
Motion 用于改变动画效果,例如加速、减速、先水平方法还是先垂直方向进行移动
CustomAttribute 用于改变自定义属性;
PropertySet 用于改变 View 特定的几个属性;
Transform 用于改变 View 中涉及到属性动画的属性,例如:rotation、scaleX 等。用法也很简单,像 Layout 那样声明出来即可。
1
2
3
4
5
6
7
8
9
10
11
12
13
14
15
16
17
18
19
20
21
22
23
24
25
26
27
28
29
30
31
32
33
34
35
| <ConstraintSet android:id="@+id/v_swipe_start">
<Constraint android:id="@+id/v_swipe">
<CustomAttribute
app:attributeName="backgroundColor"
app:customColorValue="@color/colorAccent" />
<Transform
android:scaleX="1.0"
android:scaleY="1.0" />
<Layout
android:layout_width="48dp"
android:layout_height="48dp"
app:layout_constraintBottom_toBottomOf="parent"
app:layout_constraintStart_toStartOf="parent"
app:layout_constraintTop_toTopOf="parent" />
</Constraint>
</ConstraintSet>
<ConstraintSet android:id="@+id/v_swipe_end">
<Constraint android:id="@+id/v_swipe">
<CustomAttribute
app:attributeName="backgroundColor"
app:customColorValue="@color/colorPrimary" />
<Transform
android:scaleX="3.0"
android:scaleY="3.0" />
<Layout
android:layout_width="48dp"
android:layout_height="48dp"
app:layout_constraintBottom_toBottomOf="parent"
app:layout_constraintEnd_toEndOf="parent"
app:layout_constraintTop_toTopOf="parent" />
</Constraint>
</ConstraintSet>
|
由于放大倍数较大,超出屏幕,所以在结束状态时显示存在异常。
怎么样,MotionLayout 是不是比想象中的好玩一些,就是现在不太方便调试,每次调试都需要运行,不过呢,现在这个还没发布正式版,估计在正式版中 Google 应该会解决这个问题。
本文首发于个人博客,文中全部源代码已上传至 GitHub,代码分支为:motionLayout。喜欢的麻烦点个🌟。
推荐学习网站:CodeLab。
本文封面图:Photo by NASA on Unsplash
